Hello! A long time since my last tutorial. I have been very busy lately with much work and projects. Anyway, I wanted to write this tutorial some time ago, so here it is. I really enjoyed learning Adobe After Effects, and it took more time to get used to using it, especially when I came from Adobe Animate, but at the end it’s nothing more than getting used to a new tool, and the final result is a lot better.
1. Preparing your drawing for animation
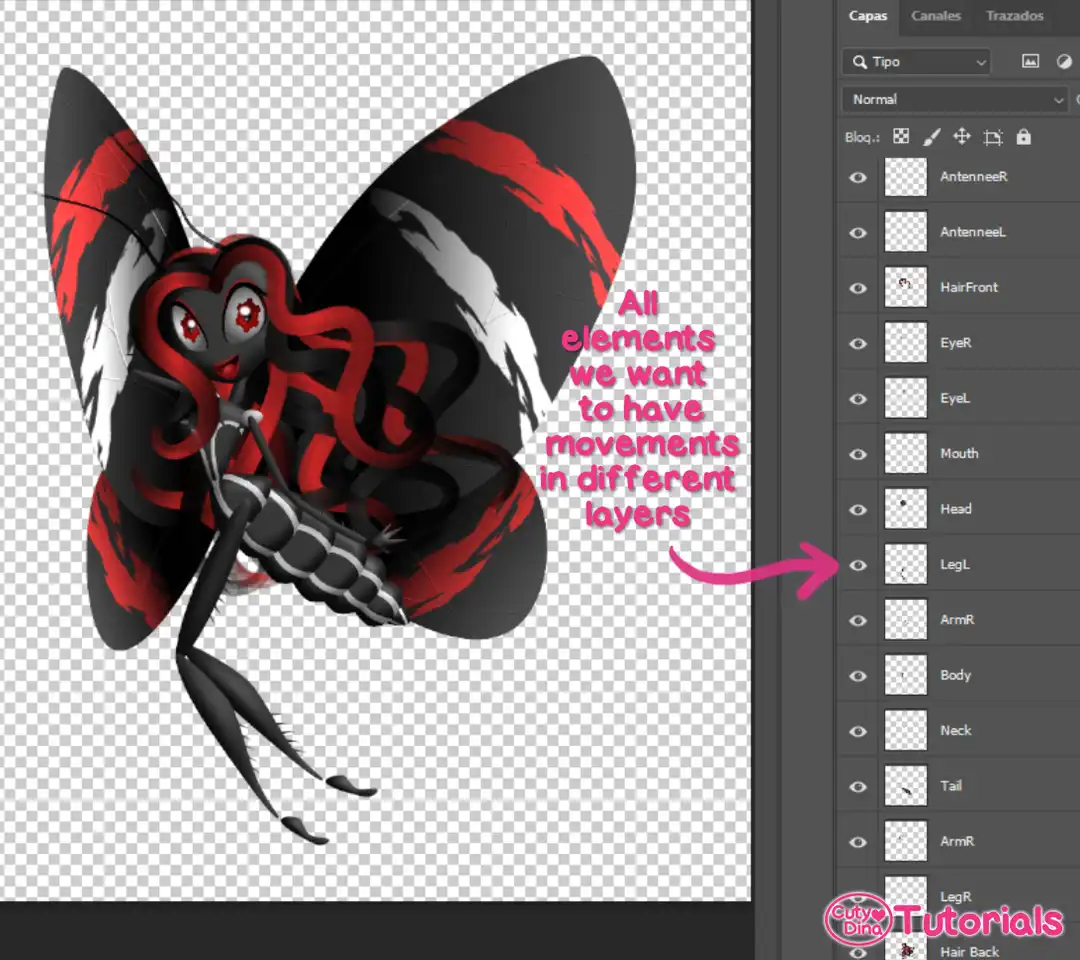
The first step for this is preparing your drawing/character/logo, etc., for animation. In this case I will use this illustration so you can see the structure you need. If you are using another drawing program instead of Adobe Photoshop, you have to export it to PSD, so After Effects can read all the layers. Also, if parts are in individual folders, it’s better to save as a new PSD version with all layers rasterized. There are many ways to import to After Effects, but I will show here the easier one for me.
Also, if you don’t want to use a PSD file, you can also export each part separately in PNG and arrange them manually, but it’s a little more tedious.
2. Importing our character to After Effects
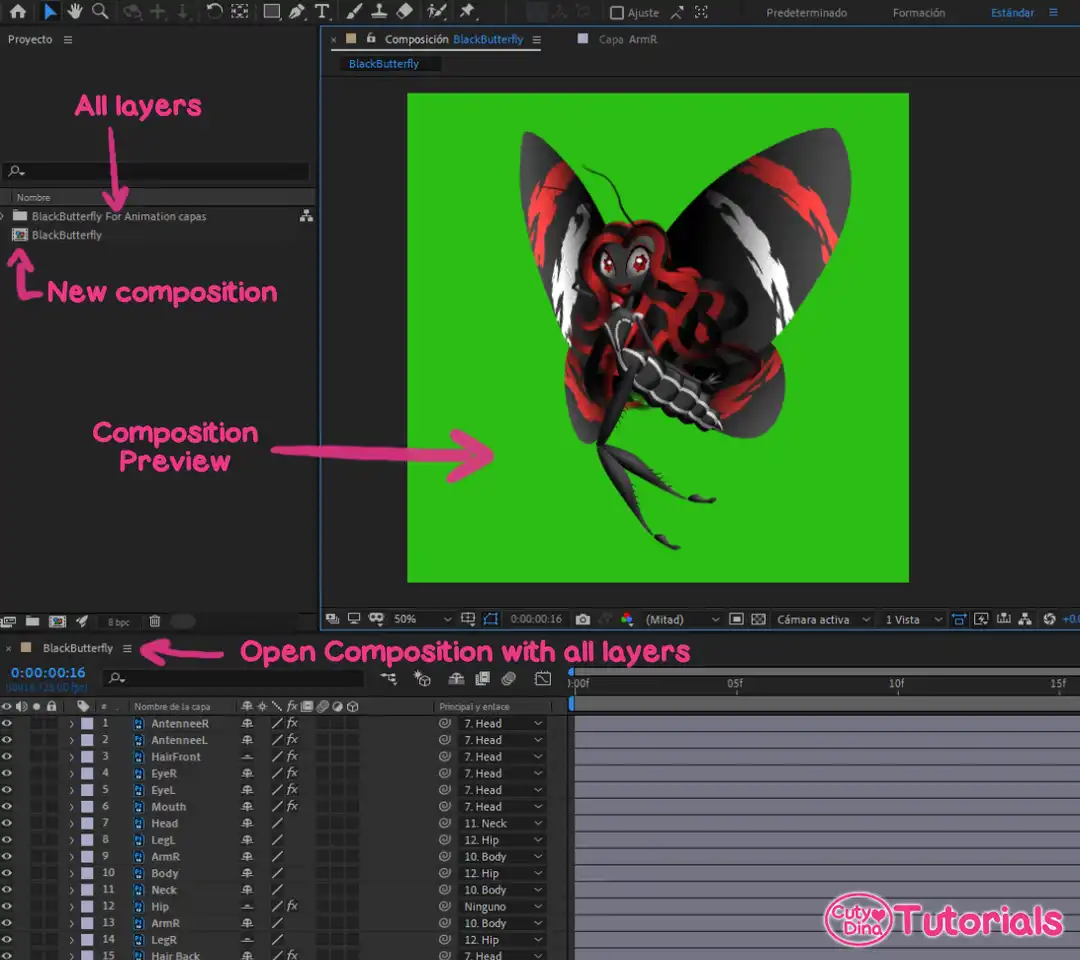
Now you can close your character in PSD and open After Effects, and when it’s open, just create a new project. Then we go to File → Import and select our PSD file. For this tutorial we’re going to select Composition → Preserve layers size, also select Editable Layers. When the file is imported correctly, you will see that After Effects created one folder with all layers and a new composition. If you double click on it you will see our composition open (don’t pay attention to the fact that my software is in Spanish; tools are the same).
3. Preparing Layers for Animation
Now it’s time to link our body parts. At the right of the Spiral icon, we just select the body part where each layer will be attached to. So when you move or rotate, elements will move with it. If you have rigged a character in the past, this will seem very familiar to you. In this character we’re going to use the hip as the main layer. You can also link layers with the spiral icon, just dragging the spiral to the attached body part—it’s your choice.
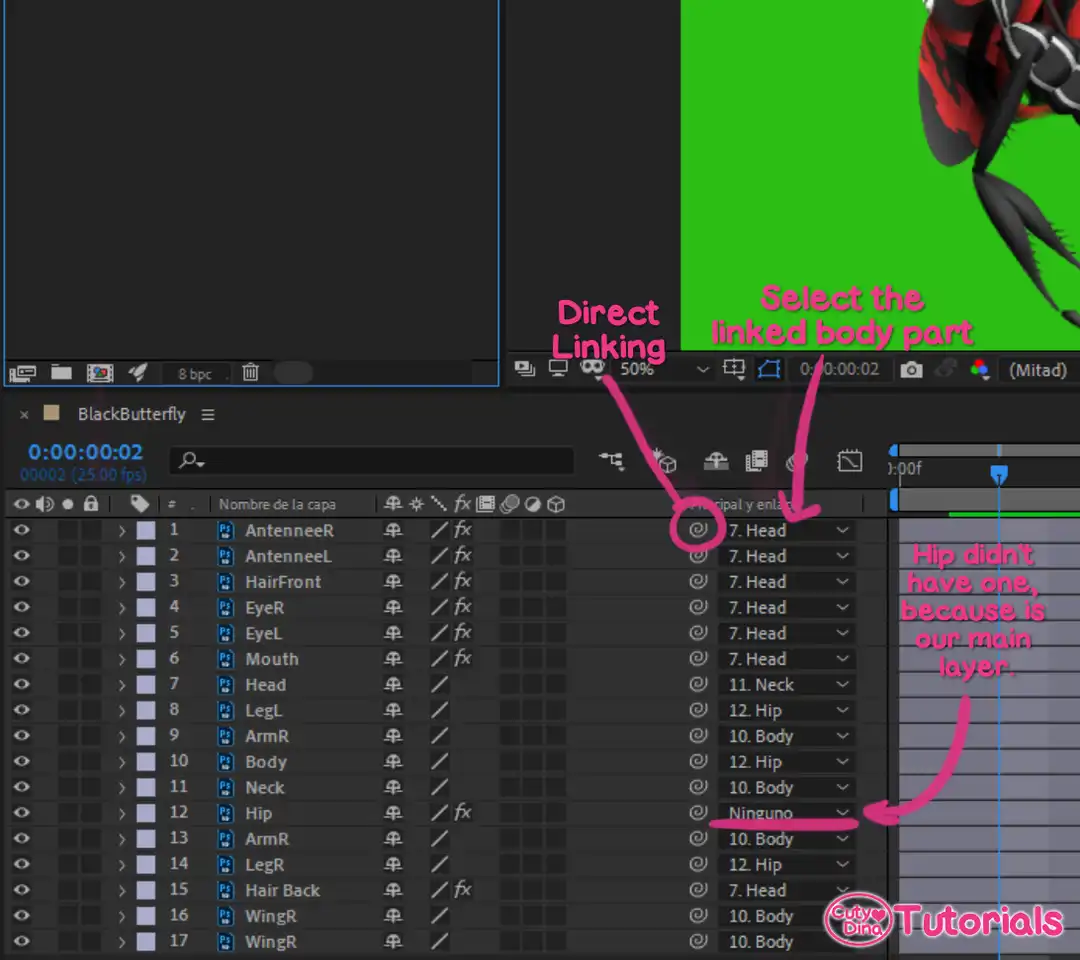
You can test if all links work well by selecting the main layer (in this case the hip) and trying to move or rotate it. If it works well, the whole character will be moving with it. If this is ok, you can continue to fix pivot points and add puppet points.
4. Puppet points VS Pivot Point movements
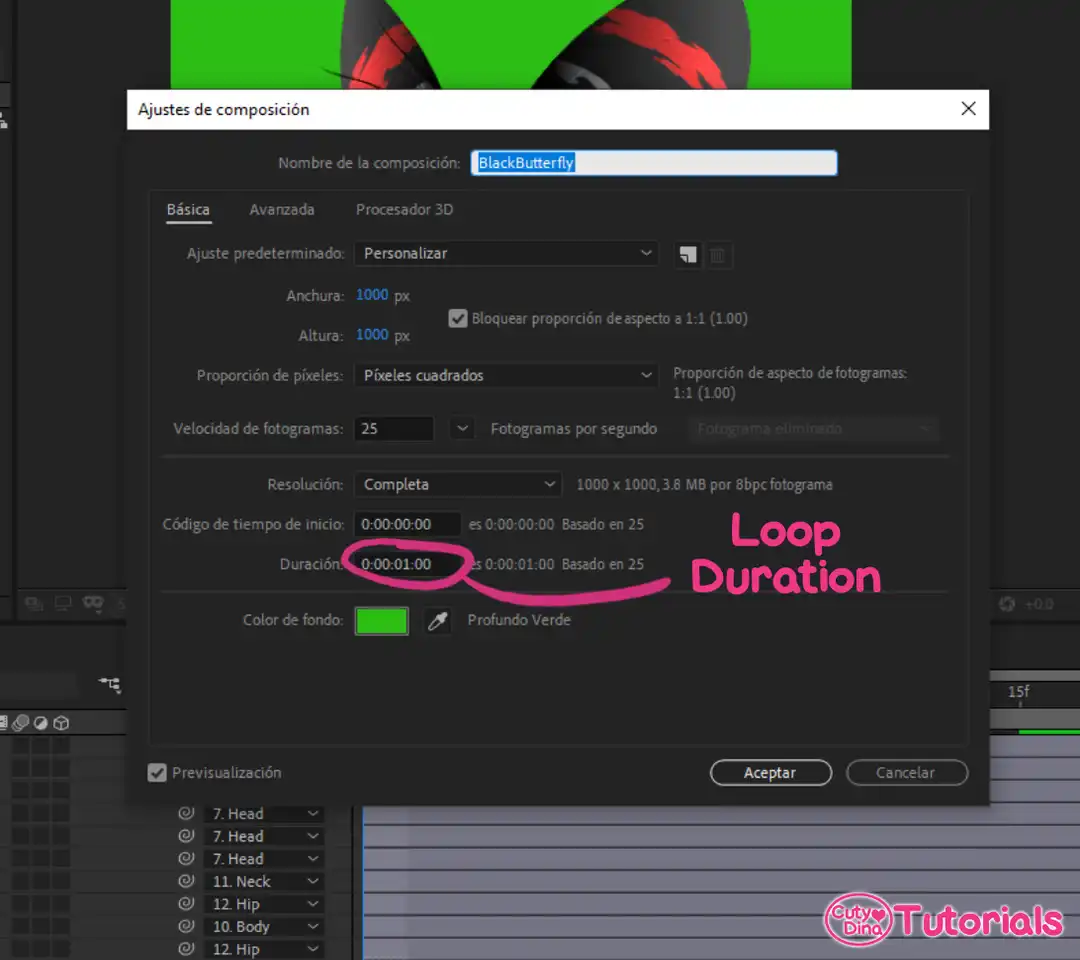
Ok, now we’re going to fix our layers one by one so they will be ready for animation. This is the last step for rigging our character. For selecting each one of the layers we just have to double click on the layer name we want to modify. By default we have a black background for our file, and in some cases (as the one in this tutorial) our character contains a lot of black and we need another color for the background. That’s very easy to change; you just need to enter Composition → Composition settings, and at the bottom you just select background color to one that is better for you.
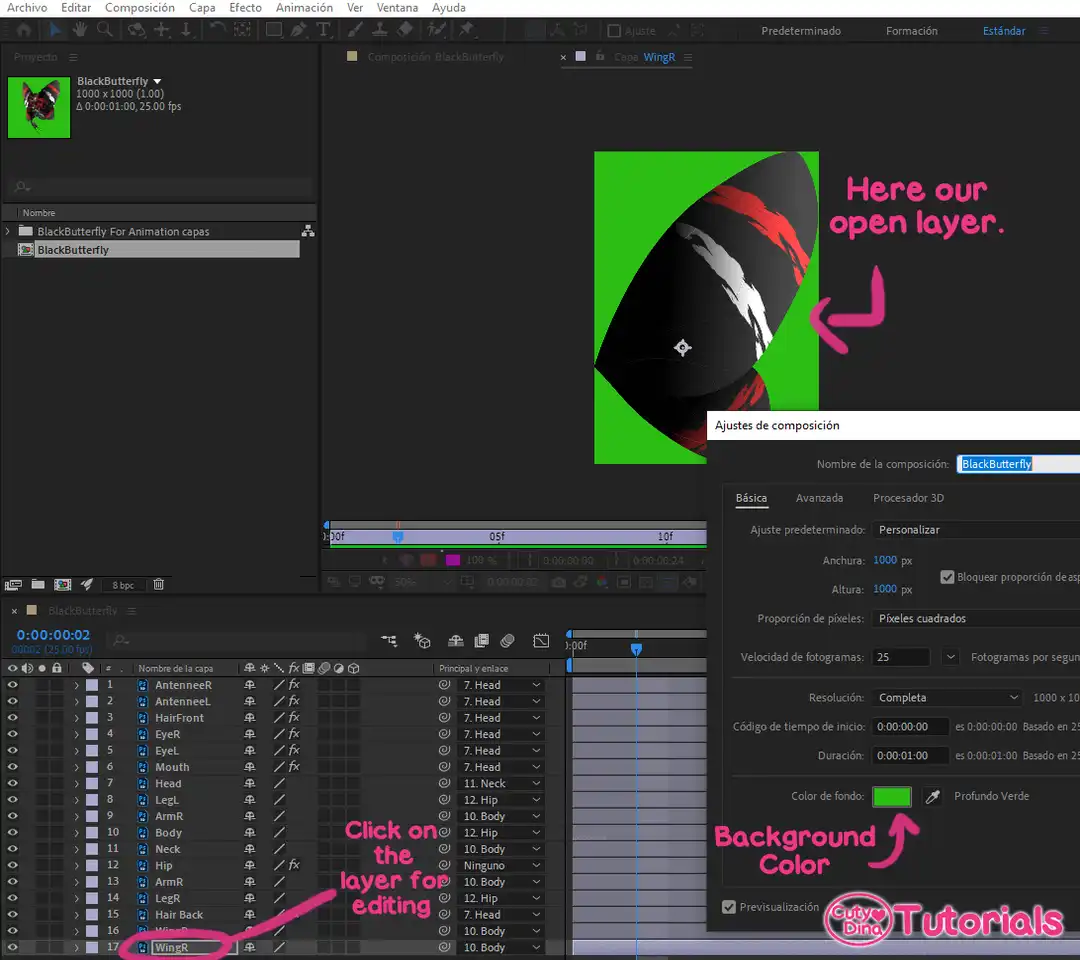
Now we have to select the pan tool so when we move our pivot points our character doesn’t move from its original position. In this case, the wing comes from the back so the point where it sticks the wing to the body is the perfect point for our pivot. This wing will not have puppet points because we just need to rotate them, so we just fix the pivot point in this layer.
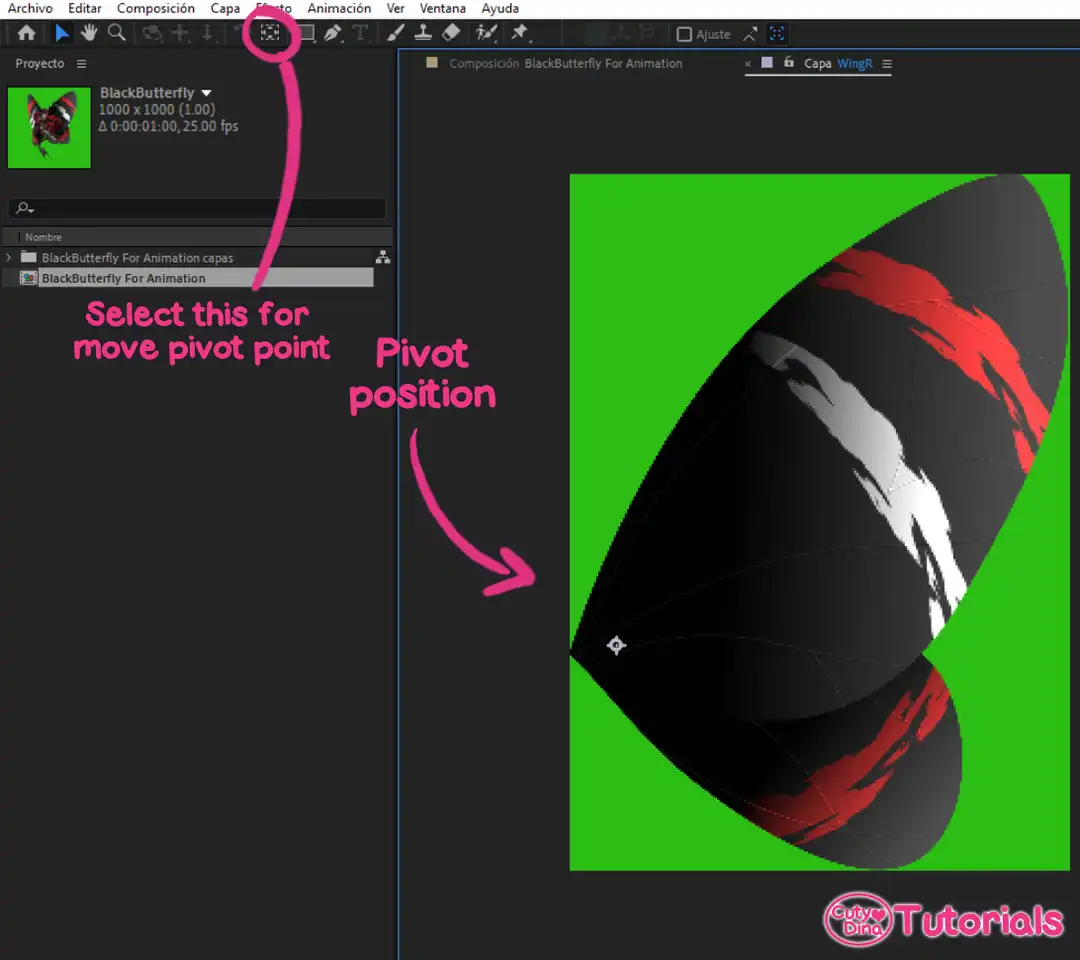
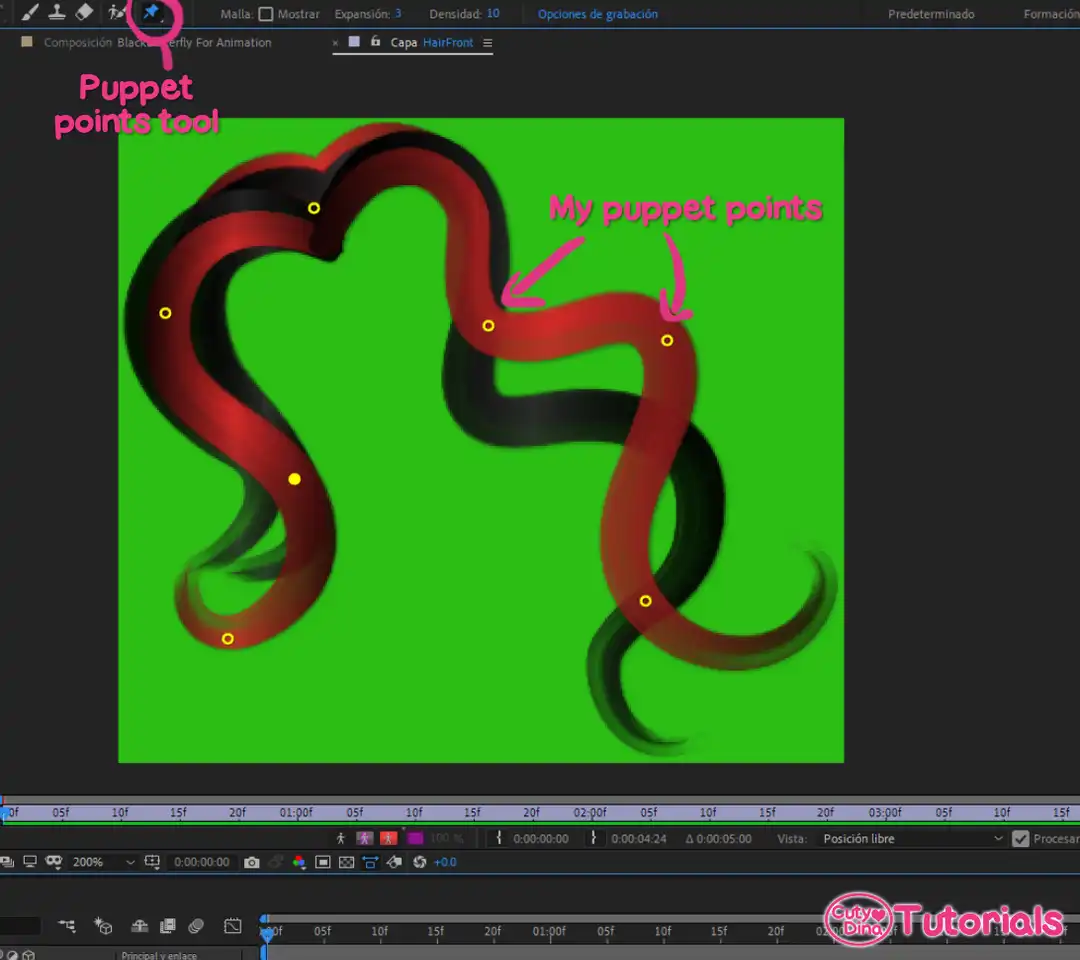
We just need to adjust pivot points to layers we just need to rotate or move. On the other hand, the puppet points will deform our drawing and in some cases they help to give more life and flexibility to our character. For example, in my case I will just add puppet points to the hair, mouth, and antennae. Sometimes we get excited with this new tool, but you will see you will not need this for every movement. Anyway, you can add more puppet points later if you want to give more movement in the future. To add puppet points you just need to select the puppet selection tool and start adding puppet points—yes, just like that. You can also test them in the layer preview, so you can see if the movement is correct for this body part. Test and add as many puppet points as you need, but not too many, because animating can become a mess in our timeline. When this is done, we are ready to start animating.
5. Animating our character
If we want to make a loop animation, we just need to make one time loop. After I will tell you how to maintain the looping as long as you want. But for now, we’re just going to make our butterfly flapping her wings. So we’re going to set our time for this movement. Now we go back to timeline settings and decide the duration for this loop; in my case I want one second duration.
If you have animated before, you will just know that animation comes first from outside movements and then we make inside movements. In my case, we’re going to animate the wings and body and then we will add all the details, such as head, hair, and legs. For wings and body we’re just going to use Rotation and Position movements. Keyboard shortcuts are P for position and R for rotation. So now we select our main layer (hip layer) and just press P on the keyboard so we can change the position of our character.
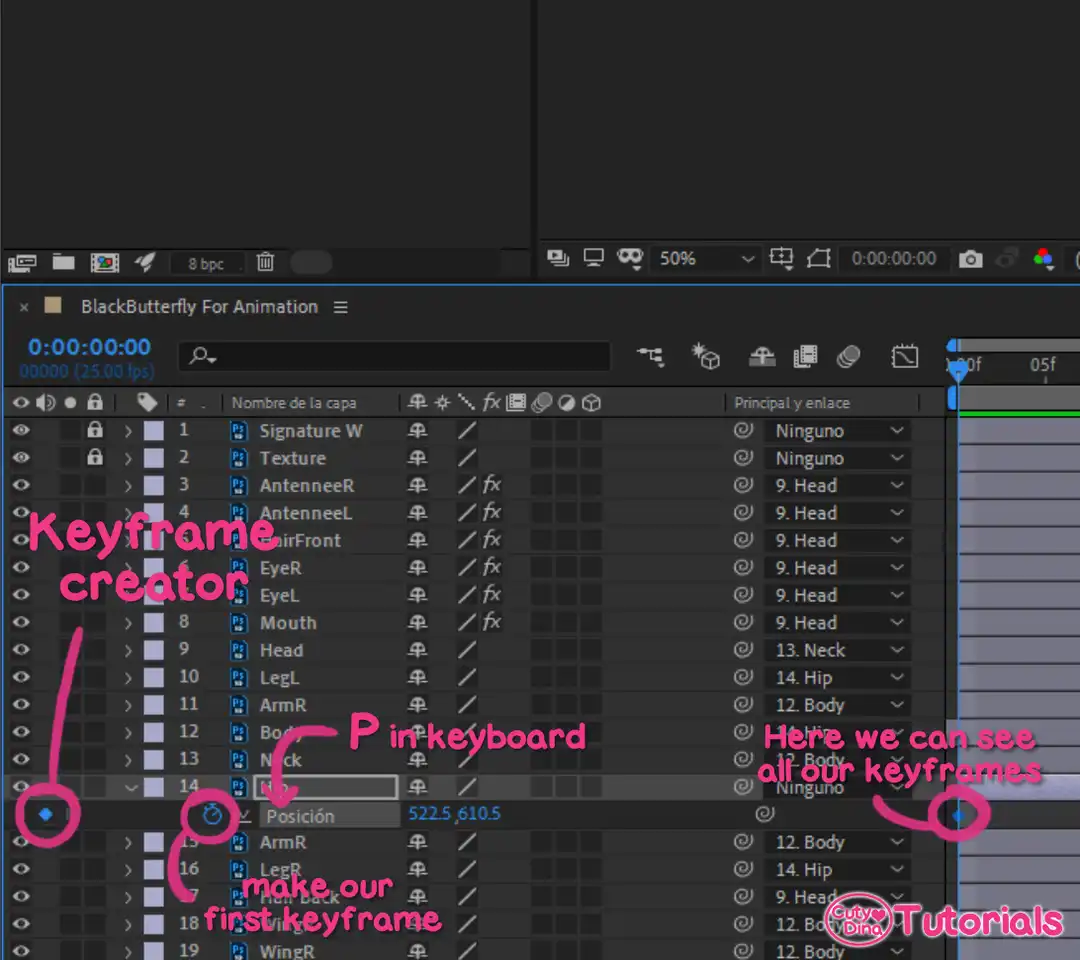
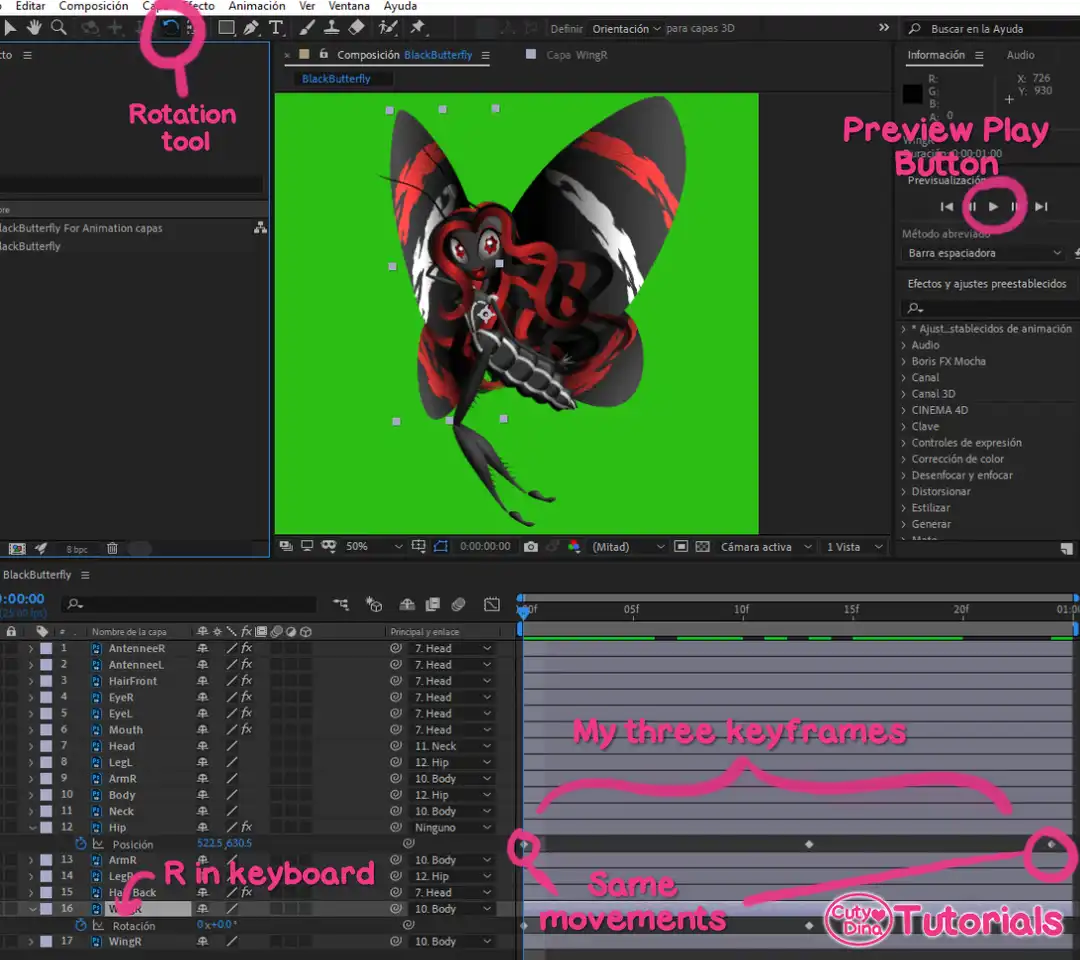
In my case as it will be a loop we will need that the animation begins and ends in the same position, so before animating we set the first position and then select the keyframe and press Ctrl+C and go to the last frame position and paste your frame with Ctrl+V. Now we make the movements we want in the middle of them; in my case, I will just add one more keyframe in the middle. Now for wings, we just need to press R on the keyboard so we can just rotate them. Also select the rotation tool in the tool panel. I will do the movement in the same keyframe so our loop works fine with wing movement, but you can animate your loop as you wish. You can continue with all simple movements with these tools.
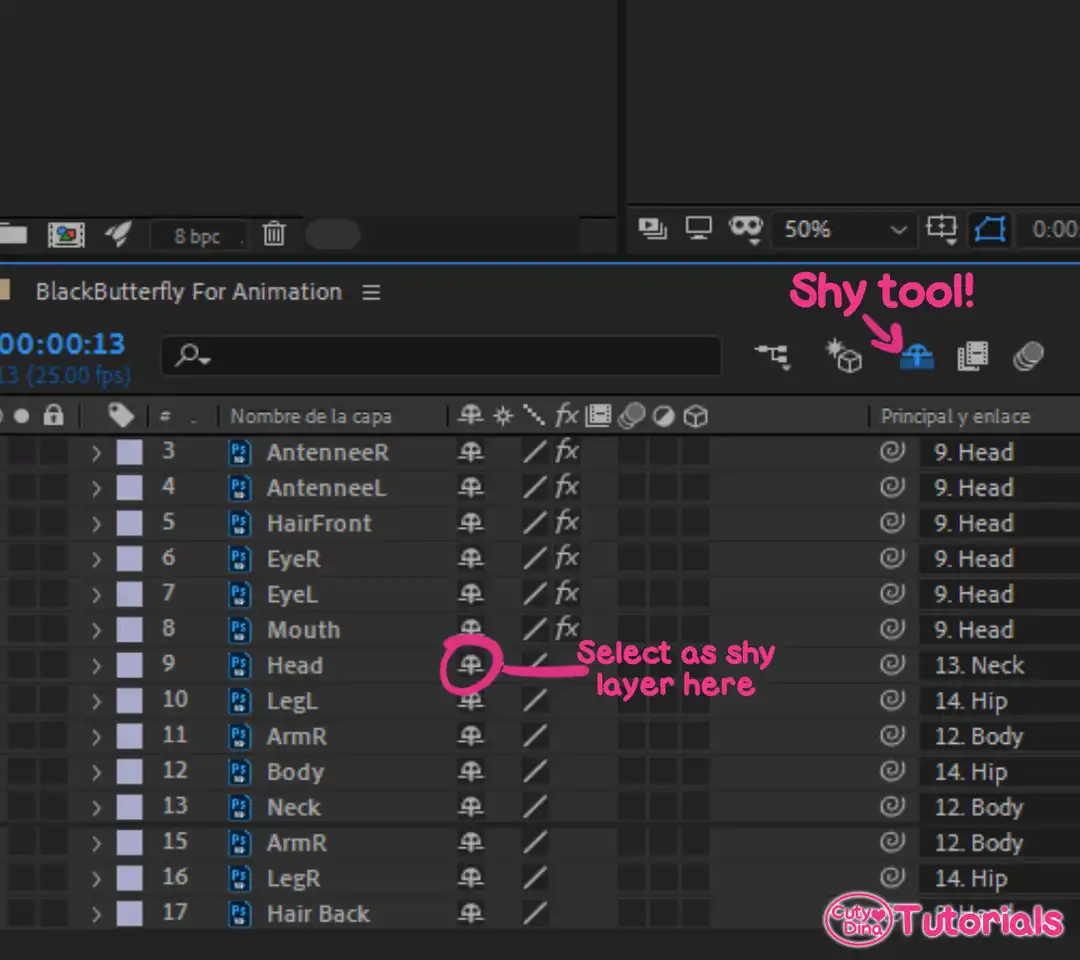
Now we’re going to detail our animation. You will see that your timeline will be a little messy in the next steps. But no worries, you can use the shy tool to clean up a little. When the shy tool is activated, all layers selected as shy layers will be hidden in our timeline, so it’s just switching on and off for having control in our timeline.
Now we’re going to animate the hair, so we need to animate all the puppet points we have. For this we will select the layer we want to modify and then we’re going to press U on the keyboard, that will open all puppet layers. I recommend animating layer by layer, so it won’t be too messy.
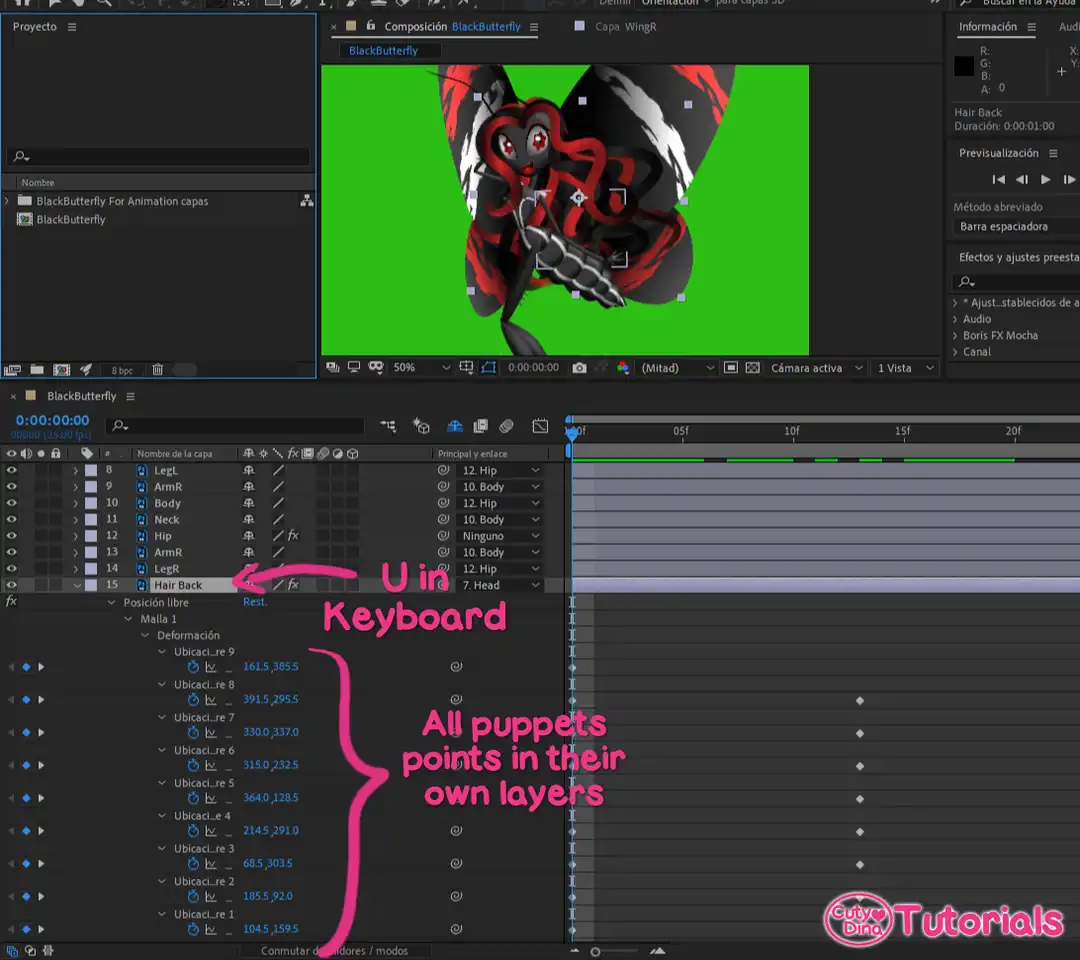
Now it’s time to set up all details for our loop animation. And when we finish we can make it longer as we need and also add some effects.
6. Making loops and adding more details to our animation
Ok, now we’re going to make a new composition so we can manage our animation better. So just click on Composition → New Composition. This new composition will have the same configuration as the last one, but now I want the composition to be ready for YouTube, so I will select the HDV 1080 25 preset and give it a duration of 10 seconds, but if you want other settings feel free to test them.
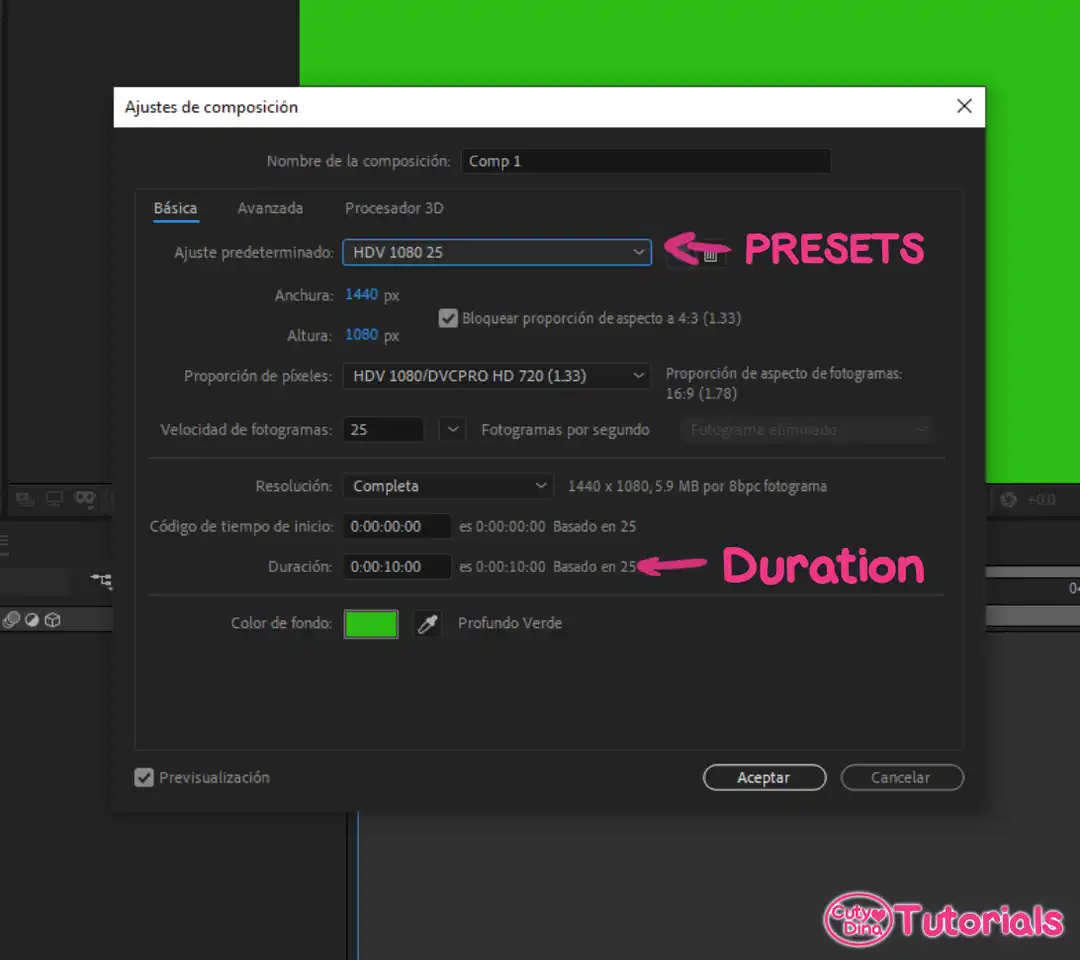
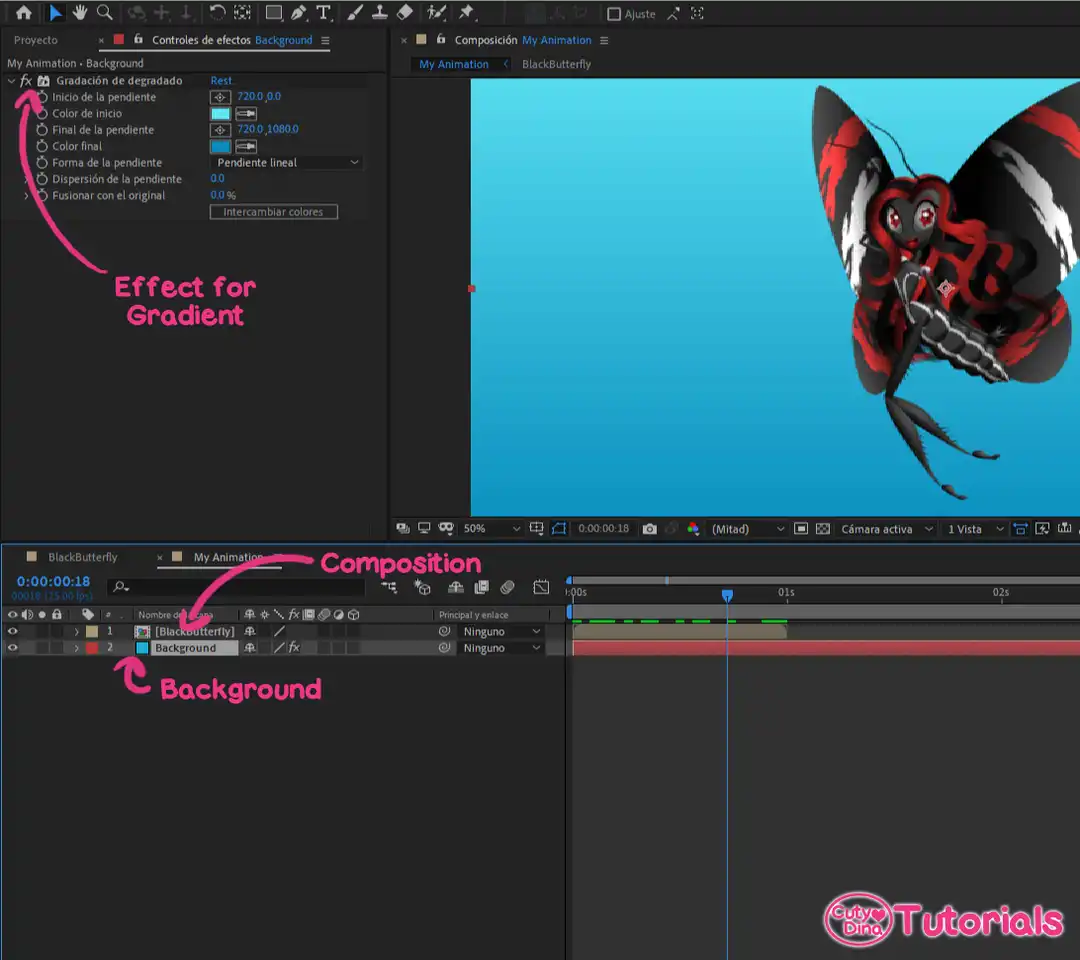
Now I will add a background to my animation. In this case I will use a solid background. So I right click in my timeline and select New Solid. That will add a solid color to our background. I want it to be a gradient background so I add an effect for that. I will add it by selecting Effect → Generate → Ramp (Spanish will be Gradación de Degradado); there we select our colors and can play with the effect options.
Ok, now the loop part is a little complicated, but once you have done it for the first time, the next ones will be easier. For the animation to become looping all the time we have to go to Layer → Time → Enable Time Remapping, that will create two keyframes at the beginning and at the end. Now you just have to create a new keyframe before the last one. Now on the last keyframe we’re going to change the time to zero.
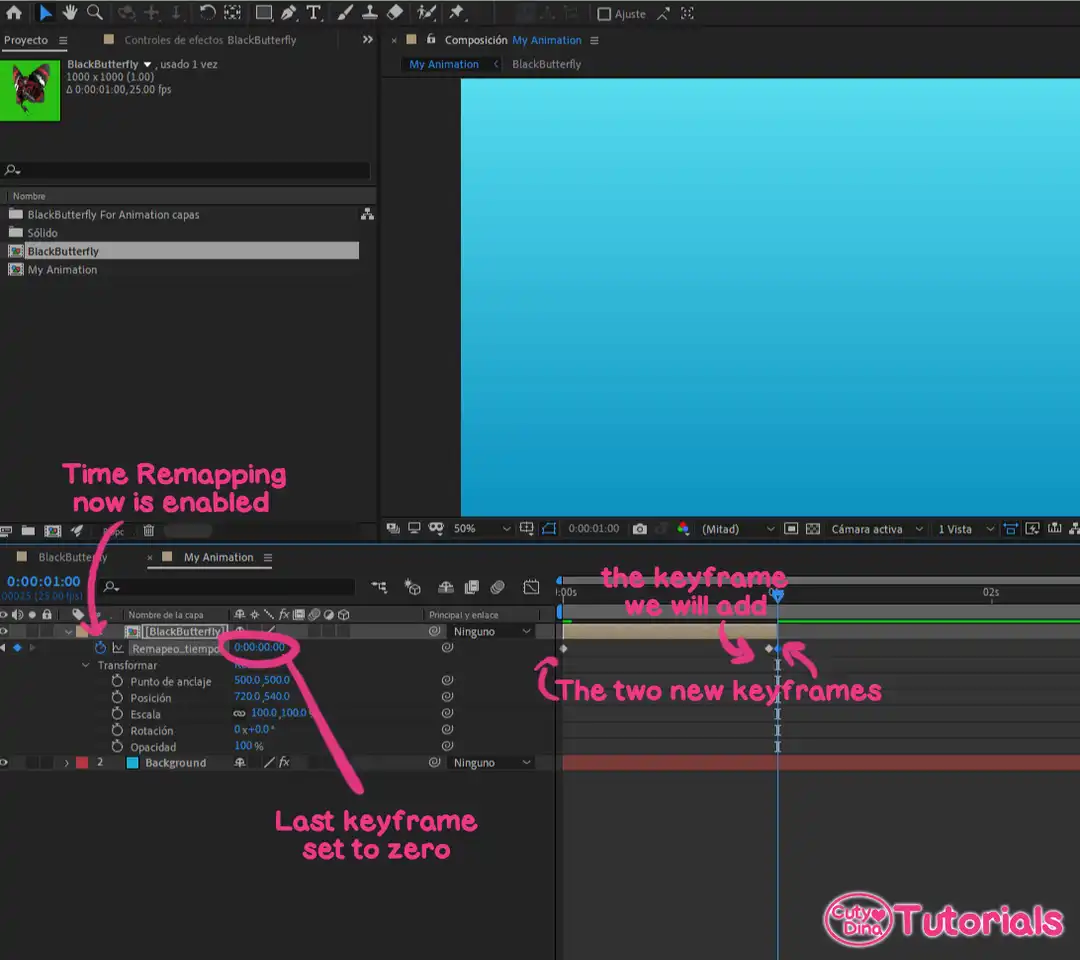
Now we delete our last keyframe. Now we’re going to select the Time remapping layer and open in the main menu Animation → Add Expression. You will see that you can add expressions now. Click on the menu Expression language and open and select Property → LoopOut(Type=“Cycle”, numKeyframes = 0), and now it will be shown in the text box. Now it’s ready; you just have to make your layer longer, in this case, as long as the composition.
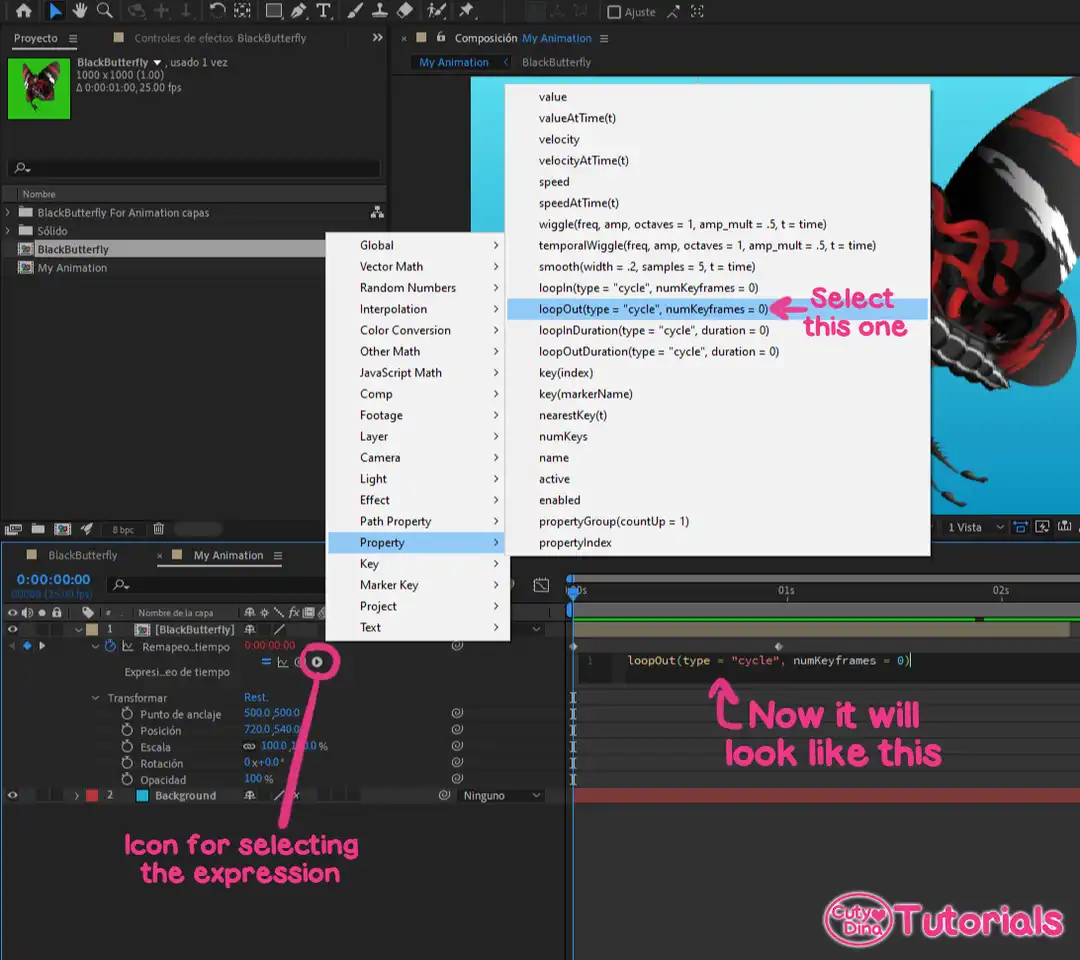
Now it’s all settled here. You can now take a look at your loop and see if you want to add more compositions, details, or effects to it. You can always enter the other compositions and modify them, and all these changes will be shown in your final composition. You can add as many sub-compositions as you want. In this case, we’re just going to add some effects and then export the animation.
7. Adding some effects
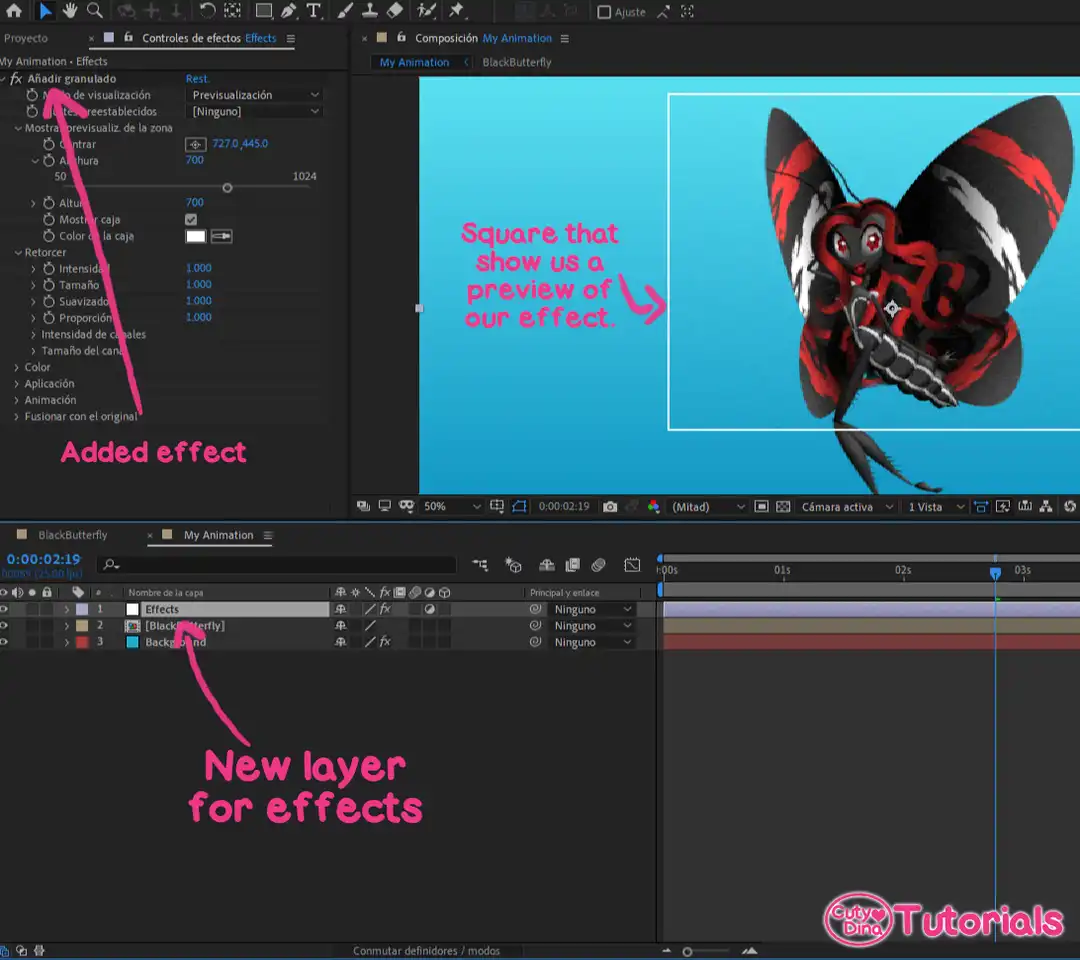
To add extra effects we’re just going to right click on our composition and then select New Settings Layer. And now it’s as easy as testing and selecting the effect that works better in our animation. In my case I’m going to select Noise and Grain → Add Grain, so the animation has some texture on it.
8. Exporting your animation
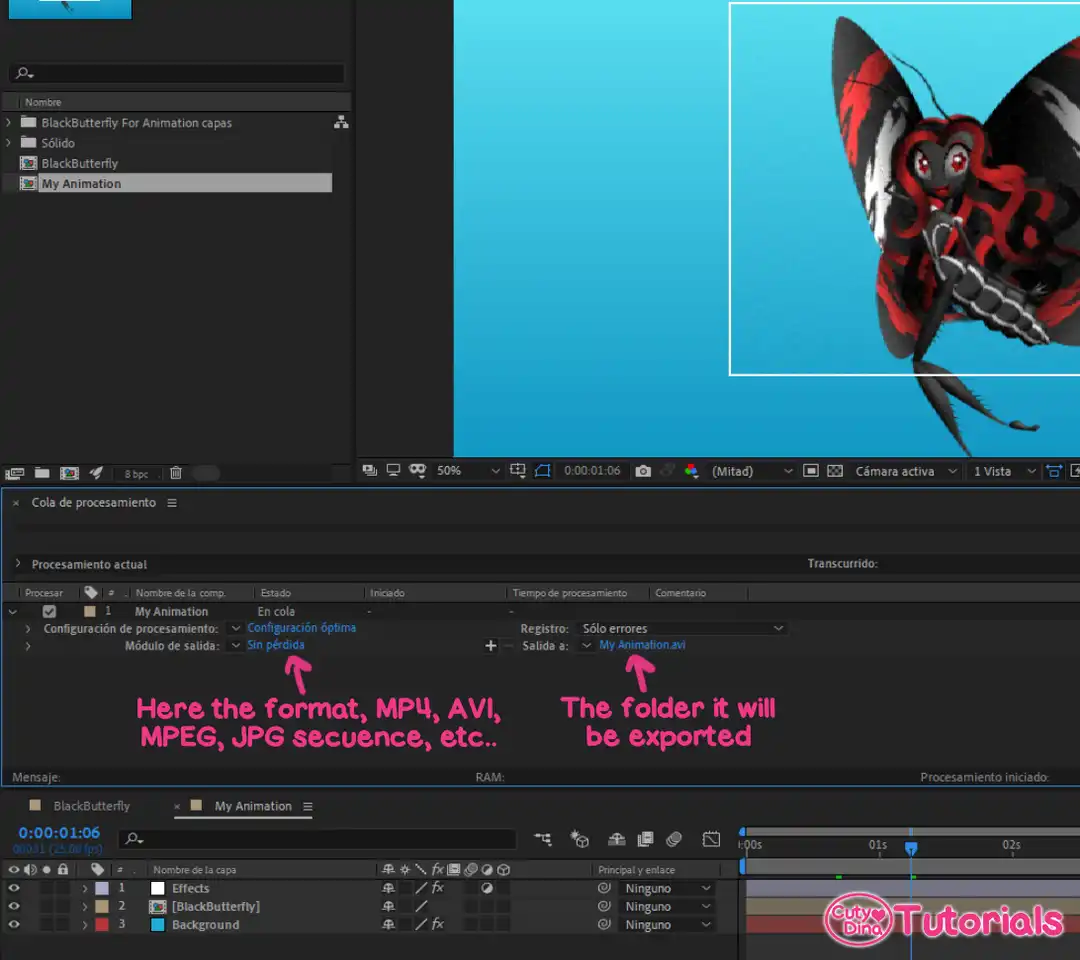
Now that our animation is ready it’s time to export for our social media. That’s an easy step—just click on File → Export → Add to Render Queue. In this case everything is correct, but you can modify the extension and folder options in the Output Module.